Sunday, December 8, 2013

RaG wReAtH

Hello!
It has been forever since I have posted! But I have been so busy with work and school. But now that it is time for the holidays, I am back to crafty stuff!   Today I made a rag wreath. I love how it only costed me about $7.00 to make! Down side...Time Consuming!!!  It's totally worth it though! Here you go.

Things you will need:
I chose 2 fabrics - 1 yard of each
1 Wire Coat Hanger
Scissors
Any embellishments you want to add. 
Time!

Step one: Stretch your wire coat hanger into a circle. You can just do with your hands.
(I forgot to take a photo of this step)

Step two: Cut your fabric into 1"x8" strips.    This is the time consuming part. The good thing to remember is that it does not have to be perfect!  It's rags!  So no worries if not all pieces are cut exactly the same size.


 Here's my piles =)

Step three:   Tie knots! Lots of them. I double knotted mine. 

Step four:  Squish them all together. The closer you get them, the more full your wreath will be. 

Step five: Add Embellishments & hang.  I found this cute bow at Hobby Lobby on sale for $2!  

Last Step:  ENJOY!!!! 


Tuesday, June 18, 2013

My First Upcycle!!!


Ok! So I finally took on a project and was quite nervous!   You see, two years ago I bought this Cruddy dresser off a coworker for $20, because me and my husband (fiance then) needed something for our clothes!   Here is our before picture.  Not too terrible for $20

So we finally got into a nicer house and scored on AMAZING king size bed set! (I can share that at a later time!) Anyhow we no longer needed this dresser!  However!....I did need an entryway table!!  So decided to get a little crazy and do something bold!  A red statement piece!  I will admit, I was EXTREMELY nervous!  But it turned out AMAZING! I freaking love it! 
HERE IT IS;
 And then, I FINALLY got to decorate my wall!    Here is the finished product!!! 
LOVE IT

Monday, April 29, 2013

EASY PEASY BBQ!!!

Ok! I have to start out this post by letting everyone know, I have NOT THE SLIGHTEST clue how to Bar-B-Que!!!   I have watched and flipped a few burgers to help my dad, but I seriously am so proud of myself this weekend. It was my dad's Birthday and I took over the grill, so that he could relax!  A co-worker had brought in left over kabobs last week, and I was way jealous!  I figured, it couldn't be that hard!  and I was so right!

I set off to the store! I picked up some chicken breasts, shrimp, onions, bell peppers, cherry tomatoes, and pineapple! (feel free to add any fruit or veggies you and your family love!)
Note: I decided to do the chicken and shrimp on different skeweres, since the chicken takes a little longer to cook.
I marinated the chicken and shrimp in a red pepper sauce!  It was a hit! and even better; I found it at Big Lots for only $2.00!
While the meat is marinating, also soak the skewer sticks in water (this keeps them from burning).
Then cut all your produce in to chunks
Thread the skewers and throw them on the grill and turn skewers occasionally.
The Chicken ones take about 10-15 minutes as the shrimp only took about 7-10!
I did not do this, but a friend told me for next time to line the grill with aluminum foil, to keep track of any pieces that fall off!   I only lost one onion in the grill! haha not bad!

Happy BBQing and Happy SUMMER!!!  whooo hoo it has finally arrived!

My Amazing MasterPiece!

Saturday, April 20, 2013

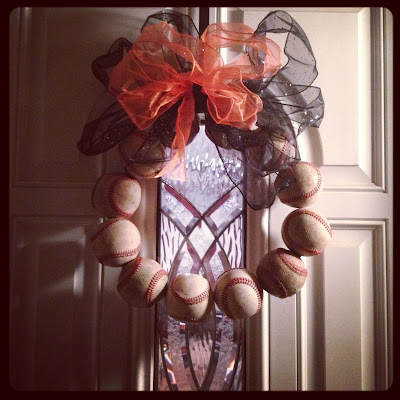
BASEBALL WREATH


THE FINISHED PROJECT!!!
(I LOVE IT!!!!!)

It is now BASEBALL SEASON!!! & GO GIANTS!  Thank goodness!  and I always see a ToN of wreaths that all spring time themed, but yet so much money=/   So I came across this idea and it was pretty much free!! (my kind of project!!!). And to top it off, my sports crazy hubby loved the idea too!
All you need is:
15 Baseballs**- from my friend's dad who coached little league!
1 wire coat hanger
Some ribbon & a pipe cleaner
Power Drill
Having a Handy Hubby helps too=)
                   ** I got 15 baseballs, in case I messed one up (which I did! haha)

All you do is cut top of the coat hanger off, drill holes through the baseballs and thread them on the wire.
Then shape the wire to the desired circle and twist the ends to close.
Then the hard part came! Seeing as how I have never made a bow! I was at Michael's and found SUCH CUTE bows, but didn't want to spend the $30 (this was supposed to be a money saving project).  So I bought some sheer wired ribbon and decided to give youTube a try (how hard could it be right).HERE'S HOW TO MAKE THE BOW

MY HANDY HANDSOME HUBBY!!!
(with my pink power tools)


Dad and Brother with the cutting and stringing
(They cant resist helping! Love my family!)


Sunday, December 2, 2012

My Favorite DIY from my wedding!

Bought a Mailbox and went into a local Vinyl Store and they took my request and had it done in about 20 minutes and only $15!!  Used as my card holder

Saturday, November 17, 2012

Wedding finally came and Gone!

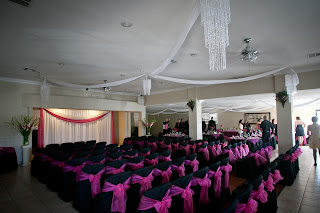
Finally! Life is starting to settle down! September 30, 2012, was a day to remember. I like to call it "The Best Day Ever!!!"   That was the day I married my Best Friend!  We Finally got our pictures back! I do love them. I will be posting more often and some fun & CHEAP wedding ideas that I put in place!   Just for today a quick glimpse of our wedding venue. We went with an all-in-one inside venue!  We found quite the deal!  And it literally turned out AMAZING! I loved it. Our colors were Hot Pink & Black and it looked very classy. Here are a few shots!

"Sending  S'More Love" Favors!


Monday, June 18, 2012

Great DAD Gifts

My dad just LOVED his Father's Day card! Money is tight right now, saving and all for the wedding. My dad totally understood, and loved that I put thought into it, even though it wasnt very expensive.
This would actually work for an assortment of people and gifts. Moms, Dads, Co-Workers, etc.  
And when I was looking at the candy aisle, there are so mant additional sayings that you could add, but I write huge! and my board only had so much space lol.