Showing posts with label DIY. Show all posts

Sunday, December 8, 2013

RaG wReAtH

Hello!
It has been forever since I have posted! But I have been so busy with work and school. But now that it is time for the holidays, I am back to crafty stuff!   Today I made a rag wreath. I love how it only costed me about $7.00 to make! Down side...Time Consuming!!!  It's totally worth it though! Here you go.

Things you will need:
I chose 2 fabrics - 1 yard of each
1 Wire Coat Hanger
Scissors
Any embellishments you want to add. 
Time!

Step one: Stretch your wire coat hanger into a circle. You can just do with your hands.
(I forgot to take a photo of this step)

Step two: Cut your fabric into 1"x8" strips.    This is the time consuming part. The good thing to remember is that it does not have to be perfect!  It's rags!  So no worries if not all pieces are cut exactly the same size.


 Here's my piles =)

Step three:   Tie knots! Lots of them. I double knotted mine. 

Step four:  Squish them all together. The closer you get them, the more full your wreath will be. 

Step five: Add Embellishments & hang.  I found this cute bow at Hobby Lobby on sale for $2!  

Last Step:  ENJOY!!!! 


Tuesday, June 18, 2013

My First Upcycle!!!


Ok! So I finally took on a project and was quite nervous!   You see, two years ago I bought this Cruddy dresser off a coworker for $20, because me and my husband (fiance then) needed something for our clothes!   Here is our before picture.  Not too terrible for $20

So we finally got into a nicer house and scored on AMAZING king size bed set! (I can share that at a later time!) Anyhow we no longer needed this dresser!  However!....I did need an entryway table!!  So decided to get a little crazy and do something bold!  A red statement piece!  I will admit, I was EXTREMELY nervous!  But it turned out AMAZING! I freaking love it! 
HERE IT IS;
 And then, I FINALLY got to decorate my wall!    Here is the finished product!!! 
LOVE IT

Saturday, April 20, 2013

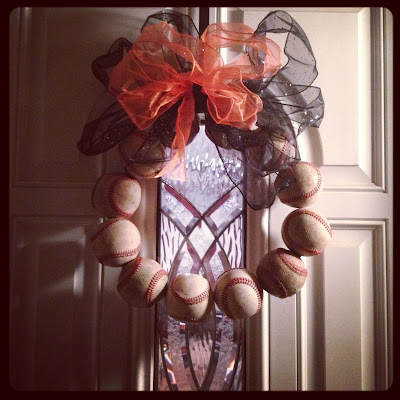
BASEBALL WREATH


THE FINISHED PROJECT!!!
(I LOVE IT!!!!!)

It is now BASEBALL SEASON!!! & GO GIANTS!  Thank goodness!  and I always see a ToN of wreaths that all spring time themed, but yet so much money=/   So I came across this idea and it was pretty much free!! (my kind of project!!!). And to top it off, my sports crazy hubby loved the idea too!
All you need is:
15 Baseballs**- from my friend's dad who coached little league!
1 wire coat hanger
Some ribbon & a pipe cleaner
Power Drill
Having a Handy Hubby helps too=)
                   ** I got 15 baseballs, in case I messed one up (which I did! haha)

All you do is cut top of the coat hanger off, drill holes through the baseballs and thread them on the wire.
Then shape the wire to the desired circle and twist the ends to close.
Then the hard part came! Seeing as how I have never made a bow! I was at Michael's and found SUCH CUTE bows, but didn't want to spend the $30 (this was supposed to be a money saving project).  So I bought some sheer wired ribbon and decided to give youTube a try (how hard could it be right).HERE'S HOW TO MAKE THE BOW

MY HANDY HANDSOME HUBBY!!!
(with my pink power tools)


Dad and Brother with the cutting and stringing
(They cant resist helping! Love my family!)


Sunday, March 25, 2012

Glitter Wine Glasses

Of course, I found this idea on pinterest as well! I went ahead and read all the reviews on this method and chose to go with the Martha Stewart All-purpose glitter! I had to do SEVERAL coats of glitter tho to get it this dark! Practically took the entire bottle. When I was don't I used a spray on adhesive paint. I would not advise putting these in the dishwasher, from what I have read.  Handwash Only!
Here is the link to check out how this lady did her glasses with loose glitter! http://diy.weddingbee.com/topic/bm-glasses-1

Friday, March 23, 2012

Bow Making: First Attempt

Here's My First Bow!
I've decided to try a hand at bow making!  I am starting very very simple!  I was in total shock how good my first bow came out.   I watched this tutorial on YouTUbe and her directions were clear and very simple to follow!

Sunday, March 18, 2012

Melted Crayon Art!

This has been a craft filled weekend! I am very pleased with one particular one! I got the idea from pinterest (my new favorite past time). There was not a direct link to any blog or anything; Just the picture! So I gathered my crayons, hot glued them to my canvas and started to blow dry! BEWARE: this project can get a bit messy! I had no newspaper, so i set mine in a box and blew it down into the box. When I was all done melting the crayons, I wanted to add a bit more. I found these fake flowers at Michaels for a few dollars and it added just enough touch!  


Friday, March 16, 2012

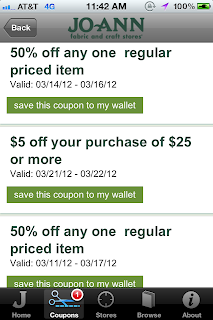
Jo-anns iPhone App!

Friend at work introduced me to an awesome app! Hopefully you have a Joann's Craft store near you! Just download this app, search through their coupons and "clip them to your wallet" Basically your wallet is equivilent to 'saving to your favorites', for quick access! And no need to waste paper! Just flash your phone to the customer service helper and save that money!

Tuesday, March 6, 2012

Easy Monogram Sign!

This is a wooden open shadow box, painted black! (ignore the wet paint).The background is a 12x12 scrapbook paper, and I found this letter at hobby lobby!  I loved the font!  I painted it pink! and added the est 2010 for my sisters wedding gift!  To hang it, I added some 2" sheer black ribbon, but I took the picture before that. Works Great though!

Wednesday, February 22, 2012

DIY Event Tickets!

Buying tickets on ticketmaster or Stubhub is the new norm it seems!  For me, my fiance LOVES sports!  It's very easy to give him tickets for any sort of gift! However, I really hate just throwing in the printed paper from these websites! So I decided to make my own tickets using Microsoft Publisher. I mocked sports tickets to the best of my knowledge and at first he didn't even realized I had made them!  Not only a good gift, but we got to keep them and put in our picture frame of the game!

Tuesday, February 21, 2012

How to Organize all your Online Recipes!

As many of us search the web for recipes in order to prepare delicious meals, we end up with so many online recipes!  What do we do with them all??  I have discovered an awesome idea that works for me, saves paper, and is clutter free! I use Microsoft OneNote. This allows you to make a digital notebook. On the left you have the name of the notebook, you may have more than one notebook. I currently only have one recipe notebook. On the top panel you have your categories (i.e. main dish, soups, salad, breakfast, etc). Then on the right you have each individual recipe under each section.
Two things that have won me over with this method is:
1- When you copy and paste a recipe, it automatically adds the web address where you got the recipe from, so if you need a quick reference you just click on the link and it sends you to the page.
2- If you so happen to make a dish, and it doesn't quite taste as good as you thought it would,you can simply delete that recipe!  No more clutter!

Thursday, February 16, 2012

DIY: Name Blocks!!

I have been recently getting into the crafting world!! I Love making blocks, usually personalized with names for kids and family!   They turn out really cute and make a great accent to any room! They are also very easy to make. I make mine from 2x4's and sand them to a smooth touch. I then paint the wood with a basic acrylic paint.  Using Scrapbook paper and a CRICUT machine, I cut out the background layer and the letter. Once the painted wood has dried, I Then  use mod podge to glue the scrapbook paper to the wood. Last step: After the mod podge is dry I use a Mod Podge Acrylic Sealer and spray on an even coat!
Note: If ever shipping or giving as a gift, DO NOT wrap in tissue paper, tends to stick, even days after they are made, I have found that wax paper works the best.


Ways to Save Money on this project:
For wood- If you know anyone who works in lumber yard, or does construction, ask them to save their extra wood, Sometimes you can even get them to cut into the size to need, i do 3" & 4" tall blocks.
For Paint- Often Home Depot, Lowes, and other home improvement stores sell their "mess up" paints for very cheap! Check the paint department. In today's case, my fiance found a box at Home Depot loaded with "tester" paints!  They were letting them go for $.10 each. He scored the whole box for $10. Best gift ever, I ended up with 180 new paints all sealed and with their own paintbrish! So just keep your eyes open! Happy Crafting!